Just like you would visit your wife in the hospital if she was having reconstructive surgery, it was time to take a Saturday morning and pay a visit to the shop.
As you can see from the photos below, the critically-important structural work is well underway, including tearout and reconstruction of the front and rear torque boxes and inner rocker / frame rails.
I've been told many times about the virtues of patience in a project like this, so I'm not expecting a whole lot of progress at this early stage. But there was an excellent sense of renewed structural integrity when I was able to open and close the doors without any special effort.
It's been over 25 years since I've been able to do that. It was cool.
Sunday, December 14, 2008
Saturday, December 6, 2008
When a Broken Down Engine is Actually Fun
Cold temperatures seem to be settling into Chicago early this winter, so I'd like to get the engine broken down and to the shop before it becomes ridiculously cold to work in the garage. I have a small $20 space heater which keeps the work area tolerable, but not when it's 20 degrees out.
I have a great book called 'How to Rebuild Small Block Ford Engines' which is helping guide me through the engine breakdown and rebuilding process. I have been pleasantly surprised by how easy the disassembly has been. Pretty much everything has come off without too much effort, which I hope is a good sign.
First you take off the intake manifold..
then remove the heads (10 bolts each)...
Now get your hands on a puller and remove the harmonic balancer from the front of the crankshaft, then take off the timing chain cover...
Now, flip the engine upside down (which is pretty easy on the stand now that the block weighs a lot less) and remove the pistons. There's lots of details I'm glancing over here that are covered in the book I mentioned above...
t
Now I can lift the crankshaft (which is pretty darn heavy) and remove the camshaft, and it'll be down to the bare metal with no more moving parts, ready to haul to an engine shop.
Brrrrrrrrr.
Sunday, November 23, 2008
Adios Old Mustang, We Hardly Knew Ye
Except for the engine and transmission, I've done all that I can (or want to) do. It's time to put her in the capable hands of a trusted, trained, and experienced professional for the heavy-duty work.
After checking out the local vintage Mustang scene here around Chicago, soliciting advice from some of its members, and a couple of shop visits, I've decided to outsource the rust exorcism to Mustang Restorations in Dundee, IL (about 30-40 miles northwest of my home in Chicago).
So yesterday morning the tow truck showed up promptly at 9AM and I wheeled the car into the alley (it was amazing how light and easy it was to maneuver by myself without any engine, transmission, or innards), and off she went.
"Where are you taking me now?"
Below is how my newly emptied garage now looks (time for a little cleanup):
At any given time, it looks like Mustang Restorations has about 20-30 cars at various stages of restoration or fixup, not exclusively Mustangs but clearly the vast majority. Chris, the proprietor (shown below in the white lab coat wheeling my car into his shop), clearly knows what he's doing and knows every screw and bolt on any 60s-70s Mustang. He even had a Mustang II in his shop (Yikes!).
Chris will take his time over the next few months (everyone I've talked to has stressed patience in this process) and remove/replace any rusted components, including the rocker frame rails, quarter panels, floor, torque boxes, battery fender apron, wheel wells, blah blah blah.
With any luck (and a few dollars less in my bank account), next Spring I should have a newly reconstructed car with zero rust, a painted engine compartment (we'll save the car painting for last) ready to plug in my newly rebuilt engine, transmission, and interior.
I know, I'm making it sound a lot simpler than it's going to be, but a guy can dream, can't he?
Thursday, November 20, 2008
Sunday, November 9, 2008
Gut Job
After getting the engine and transmission out, it was time to gut the interior and get it down to the bare metal. This included taking out the seats and seat belts, the door panels and interior trim, carpeting, and the convertible top assembly and hydraulics.
The seats are held in place by 4 bolts each that you reach thru 1 1/2" diameter holes from underneath. I had to go to the hardware store and pick up a extra deep 1/2" wrench socket to get at them. 4 of these 8 bolts were so rusted they just broke off instead of loosening.
One of the most important pieces of equipment in a restoration is a shop vac. After ripping out the carpet, scraping as much ratty old carpet pad and rust layer from the interior sheet metal, and then vacuuming it all out, you could clearly see the extent of the rust and deterioration, along with what metal truly needs replacement.
A few more minor things to dissect and then it's time to call the tow truck and the restoration shop.
Sunday, October 26, 2008
Need a Lift ?
It was about 2PM on Saturday afternoon. I had spent most of the day underneath, undoing bolts to the transmission, starter, exhaust manifold, engine mounts, oil pan, blah blah blah.
I was wiped. I was just about ready to clean up shop, wash my hands, grab some couch and channel surf between college football games. Then I hear this loud rolling metal sound in the alley. I scooted out from under the car just in time to see my wife Mary with our neighbor Mike, who just happened to be Mike the guy down the street with an engine lift.
Now I hadn't really planned yet for the engine lift portion of the weekend. I knew Mary mentioned a guy down the street who had one, and I figured at some point soon I'd be looking for one, and most likely renting.
So not being one to ruin a good thing, I kept on working with Mike's help for the next hour or so and we lifted the hunk o' iron without too much effort.
I've since been told by a couple of more experienced car-engine-lifter-dudes that it would've been a better idea to yank the engine and transmission together (and even Mike hinted at this), but by the time the lift showed up the bolts connecting the trans to the engine block were already off, so (as you can see in the above photo) the torque converter came with the engine.
What was quite the surprise was the engine block's red color. I did not recall (of course it WAS 25 years ago) that the engine block I slapped in there 25 years ago was red. All I remember was getting it in, getting it to run, and painting it good old Ford Engine Blue. But obviously there was lots of red that I just couldn't get to with that can of 1982 spray paint.
Oh, did I mention that it's actually a JET engine?
Mike the neighbor was full of surprises that afternoon, especially when he just so happened to have a 'spare' engine stand that he would sell me for $50. I shelled out the fifty, and later tipped him with a couple of six packs.
An engine lift and an engine stand. Two key pieces of equipment that literally just showed up when I needed them most on a Saturday afternoon.
I was wiped. I was just about ready to clean up shop, wash my hands, grab some couch and channel surf between college football games. Then I hear this loud rolling metal sound in the alley. I scooted out from under the car just in time to see my wife Mary with our neighbor Mike, who just happened to be Mike the guy down the street with an engine lift.
Now I hadn't really planned yet for the engine lift portion of the weekend. I knew Mary mentioned a guy down the street who had one, and I figured at some point soon I'd be looking for one, and most likely renting.
So not being one to ruin a good thing, I kept on working with Mike's help for the next hour or so and we lifted the hunk o' iron without too much effort.
I've since been told by a couple of more experienced car-engine-lifter-dudes that it would've been a better idea to yank the engine and transmission together (and even Mike hinted at this), but by the time the lift showed up the bolts connecting the trans to the engine block were already off, so (as you can see in the above photo) the torque converter came with the engine.
What was quite the surprise was the engine block's red color. I did not recall (of course it WAS 25 years ago) that the engine block I slapped in there 25 years ago was red. All I remember was getting it in, getting it to run, and painting it good old Ford Engine Blue. But obviously there was lots of red that I just couldn't get to with that can of 1982 spray paint.
Oh, did I mention that it's actually a JET engine?
Mike the neighbor was full of surprises that afternoon, especially when he just so happened to have a 'spare' engine stand that he would sell me for $50. I shelled out the fifty, and later tipped him with a couple of six packs.
An engine lift and an engine stand. Two key pieces of equipment that literally just showed up when I needed them most on a Saturday afternoon.
Saturday, October 25, 2008
Get Out the Advil
Once the easy stuff was out of the way, it was time to warm up the socket wrenches. One essential piece of equipment for engine and car dissection is a can of PB Blaster.
There are literally dozens of bolts that just won't budge on your first attempt. Finding the right angle to get at many of them with any kind of leverage becomes a major challenge. Many bolts can only be attacked from underneath with the car up on jack stands.
Most of the engine bolts were relatively easy, because they had been appropriately torqued back when I replaced the engine in 1982. There were 2 or 3 super-challenging bolts that took almost an hour each to figure out and get them undone. Getting each of them to budge for the first time were a series of major victories.
It was enjoyable to have my son Cooper help out taking off the valve covers and seeing the lifters, valves and springs for the first time.
For several days in a row, I felt like I had done Yoga, Pilates, and weightlifting together each day. It was fun.
Sunday, October 19, 2008
What Have I Got Myself Into ?
Now that the car is in my garage, it's time to take inventory and develop the restoration strategy.
First of all, I don't do welding. Welding is probably one of those things that's easier than it seems, but our garage (accessible from your typical Chicago alley) still needs to function as a 2-car garage and the space just isn't available for a lot of heavy equipment and hauling around big pieces of sheet metal.
HERE is a link to a blog by someone who is restoring a 68 convertible and is into the sheet metal and welding. God bless 'em.
So here's the basic 5-step plan:
1) Dissect the car -- engine, transmission, interior.
2) Haul it out to a body shop (preferrably an old Mustang specialist) for body work.
3) Rebuild the engine and transmission while it's in the shop.
4) Get the car back in the garage and start putting it back together again.
5) Drive it back out to the body shop for painting
It's gonna take a year or two, and everyone I've solicited advice from has emphasized patience (and a big checking account, but more about that later).
So I assembled all my tools, went out to AutoZone and Pep Boys and picked up a creeper, a hydraulic jack, some jack stands, more pegboard hangers, workshop gloves, safety glasses, a BUNCH of shop towels and a small tub of GoJo (hand degreaser). I also scrambled out to Target and grabbed an assortment of plastic tubs, Ziploc bags and permanent marker for storage and labeling.
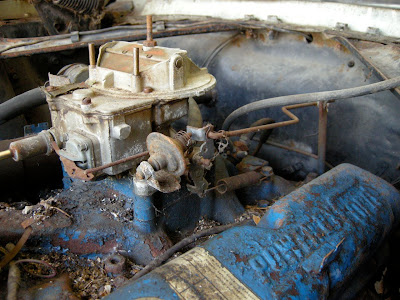
Once my garage was prepped and equipped, I finally popped the hood, took out the easy stuff (air cleaner, battery, sparkplug wires, etc.) and started to take a serious look at what was in front of me:
Oh boy.
Saturday, October 18, 2008
Onto a New Life
After 25 years of procrastination (and several months of garage-cleaning to make room), it was time to pull the trigger and call a towing service. It was all going so smoothly until the tow truck became stuck in my mother-in-law's backyard mud.
Special thanks to my brother-in-law David and Robert the next-door neighbor who took the better part of their Saturday afternoon to help dig out the truck.
And I can't thank my mother-in-law enough for her patience over the years wondering when the $*!# that stupid heap o' rust would be out of there, but finally it's gone from her backyard garage and into mine.
From the photo above, you can just feel the car saying, "What's going on? Everything was just fine back with the squirrels and raccoons. Where are we going? Goodbye Waukegan."
Tuesday, September 9, 2008
Someday Has Arrived
I bought this 1968 Mustang convertible during my sophomore year at the University of Michigan (1978) for $250. The odometer hit 100,000 miles on my way home that day. Until 1983, it was my ride thru the end of graduate school at the University of Illinois.
Over those 5 years, I put another 46,000 miles on it, which included 2-3 years of a $99 Maaco blue paint job (a fun color but not its original 1968 Seafoam Green), a transmission transplant, several routine old car maintenance 'things' (batteries, alternator, starter, radiator, master cylinder, etc.), and in the fall of 1982 I had it painted back to its original color plus I replaced the original 289 v8 engine with a new (rebuilt) one.
But alas, 15 years of midwestern Winters and salted highways had taken its inevitable toll. The bottom was rusting out, especially leaf springs which held up the car's rear axle. It was sagging to the point where opening and closing doors required a special 'technique'. In the Spring of 1983 it was retired to a Michigan garage when I moved to Chicago.
In 1986 I was married and soon thereafter, the Mustang's Michigan home was no longer available. My wonderful mother-in-law had some unused space available in a raggedy old stable in her Waukegan backyard so we hauled it over and that became the car's home. For the past 22 years, I'd take a peek every now and then as it became a rusty home to racoons, squirrels, and probably lots of other varmints.
I always held onto it, survived occasional temptations and the wife's suggestions to sell it for a few hundred dollars, thinking that someday I might want to yank it out of there and see what I could do with it.
Someday has arrived.
Subscribe to:
Posts (Atom)